Configure ALSA Capture Devices from CLI
I do not know about you, but I found this to be a major headache. Audio has always been a pain in Linux and Unix environments, largely to the cornucopia of daemons and servers to do the job. The major players are OSS, ALSA, and PulseAudio, with the latter unfortunately making major headway in recent years. I do hear it is more advanced than ALSA, but my personal opinion is that PulseAudio is still very much rought around the edges. If you want to know the benefits, read this article for a quick rundown. Sick of it already, I followed a Fedora user’s guide and removed the plugin that interfaces with ALSA to ensure that PulseAudio is not the default sound server.
sudo yum remove alsa-plugins-pulseaudio
I won’t be missing that anytime soon. Now that I have ALSA all to myself, I think it is time to learn how to mute and unmute devices from the CLI, instead of using the gnome-volume-control. I stumbled upon amixer during my Googling, which is not to be confused with the more graphical, but less useful, alsamixer. It is not part of the base Fedora 9 install, so you need to install it first:
sudo yum install amixer
Then you ought to play with the alsamixer command and inspect your current configuration, so you can determine which “card” (audio device) you want to configure from the command line. So, try each “card” until you discover which one is the capture device of your choosing. For me, it is my USB headset. Use the following command, where you should replace N with 0, then increment until you find what you are looking for:
alsamixer -c N
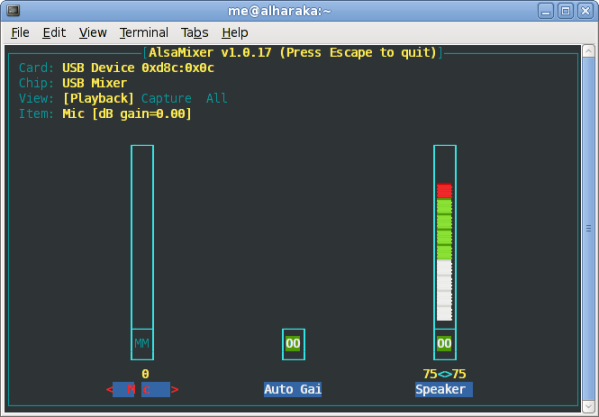
I discovered that my USB headset is card 2 (the sound devices on my nVidia motherboard is card 0 and its modem is card 1). You will know which one is correct by the name of the device in the upper lefthand corner. For me, it was USB Device 0xd8c:0x0c, the same as it was in the gnome-volume-control applet. See the screenshot below if you do not follow me.

Alsamixer running while I configure my USB headset.
Once you know that, it is a piece of cake. First, determine the name of the capture device for the card:
amixer -c 2
This will give you output resembling this (I am not sure how much it will vary depending on hardware):
Simple mixer control ‘Mic’,0
Capabilities: pvolume pvolume-joined cvolume pswitch pswitch-joined cswitch cswitch-joined
Playback channels: Mono
Capture channels: Mono
Limits: Playback 0 – 32 Capture 0 – 16
Mono: Playback 0 [0%] [0.00dB] [off] Capture 0 [0%] [0.00dB] [on]
Simple mixer control ‘Auto Gain Control’,0
Capabilities: pswitch pswitch-joined
Playback channels: Mono
Mono: Playback [on]
Simple mixer control ‘Speaker’,0
Capabilities: pvolume pswitch pswitch-joined
Playback channels: Front Left – Front Right
Limits: Playback 0 – 151
Mono:
Front Left: Playback 114 [75%] [-7.85dB] [on]
Front Right: Playback 114 [75%] [-7.85dB] [on]
For my laptop, the capture device is cleverly named ‘Mic.’ So, to mute the microphone and set the volume to 0%, the command is:
amixer -c 2 sset Mic 0% cap mute
To unmute the microphone and set the volume to 100%, the command is:
amixer -c 2 sset Mic 100% cap unmute
It’s as simple as that. Soon, I hope to find a way to run this command as soon as the driver loads. I imagine this will require some sort of bash scripting. I will write up something here when I have a solution.
About this entry
You’re currently reading “Configure ALSA Capture Devices from CLI,” an entry on *nix Frustrations
- Published:
- March 22, 2009 / 3:56 pm
- Category:
- Fedora Core
1 Comment
Jump to comment form | comment rss [?] | trackback uri [?]